To share a
file on SAFE SYNC you need to be on the web portal, if you do not have this URL
saved you can open the program via System Tray:
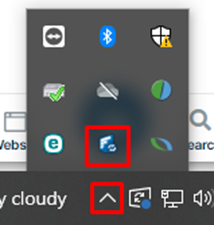
And
then select the “Website” option.
You will need to enter your account credentials.
The main page will give you a breakdown of the files and folders you have synced, your data size, info on your shares and devices.
Underneath
this you will see “All Files”, “Recent Documents” and “Starred Documents”.
You
also have this menu to the left.
Selecting “My
Files” will show you the files/folders you have available, hover over the file and
select the “Share” button from the icons that appear. To share multiple files you need to add them to a folder.
Or select
the three dots and select “Share”.
Your
share link has been created. You can edit the link if needs be, using the blue
boxes to the right, you can either; copy link to clipboard, open the link in a
new window, email the link, or create a QR code for it. In this guide we are sharing via email.
Selecting
“Change” under “This share is Public” allows you add restrictions to the file.
PLEASE NOTE: If make any changes here you need to press the
“ok” at the bottom of the screen and it will take you back to the page you were
on. You then have to view your share in the “shared by me” section on the left.
Hover over the one you were working on and select “Manage Share” to bring back
the window you were on if you want to make additional changes. Or you can press
the “email” icon from here.
You can
change some share options if you wish:
Available
Sharing Permissions are as follows. You can set it so the person can view and
download the file, or just view only.
View
and download, or view only but with a password. You can view the password set,
or click into it to change to your own.
Please note: if you change the password you will need to
press “save” to the right. Press the “share” button to copy the share link and
password, you will get a notification to the right this has been done.
You can
also share with specific Users/Groups. You can select what you want to allow
the users to do from here.
When
inviting users there is a tick box for “Send email”. If you leave this ticked
it will send them an email when you add them to the share. So you don’t have to
send this later. The “edit” button allows you to change the email subject and
message.
When ready
to share, press the “email” icon from either the share link window you were in,
or from “Manage Shares”.
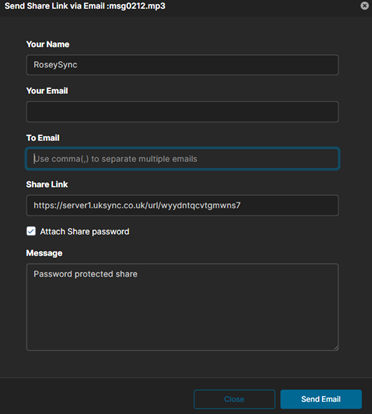
Enter in
the email you want to send it to and a message. If you have no selected the
password option you will not see the “Attach Share password” tick box. Press
“send email” when read.
You
will see a green “success” message to the right.
The user
you shared it with will receive an email that gives them the link to the share
(and the access password if added).
They need
to select on the link (and enter the password if added). From here they will be
able to view the file (file type depending) and download it, if given the
access to do so.